Keras Image Classification
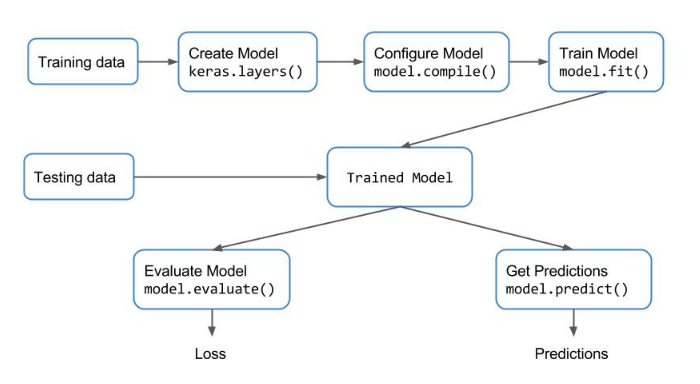
Keras Workflow
Deep learning using Keras – The Basics
Introduction
-
- Learn CNN and how to use them for an Image classification
- see how data augmentation helps in improving the performance
- use MNIST and CIFAR10 dataset
Motivation
- About MNIST dataset, the performance is pretty good at 98.3%
- In training dataset, all images are centered. If the images in the test set are off-center, then the accuracy is miserably
- That is translation-Invariant
- To improve above examples, train separate MLPs for different locations or we have to make sure that we have all these variations in the training set as well
- CNN can solve above problems
CNN
- CNN are a form of feedforward NN
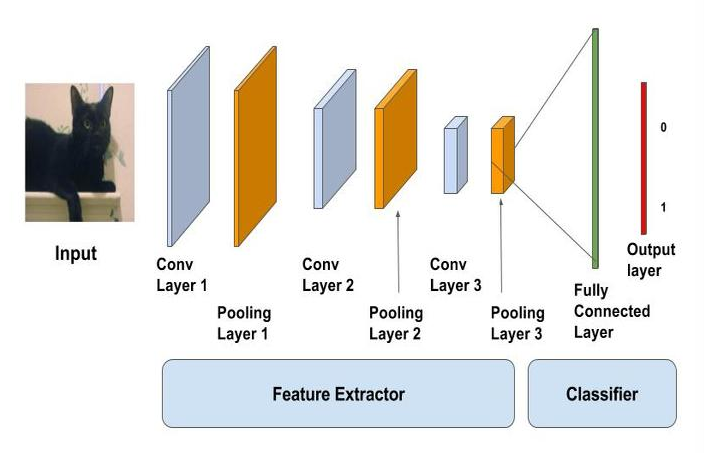
- CNN, max-pooling layer act as the feature extractor
- fully connected layer act as the non-linear transformation
- The output can be a softmax layer indicating whether there is a cat or somthing else
Convolutional Layer
- The neurons look for specific features, If they find the features they are looking for, they produce a high activation
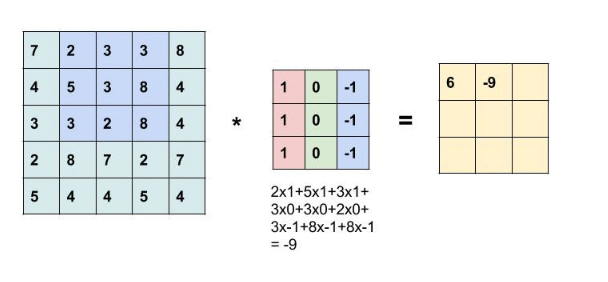
- Convolution kernel is slid over the entire matrix to obtain an activation map
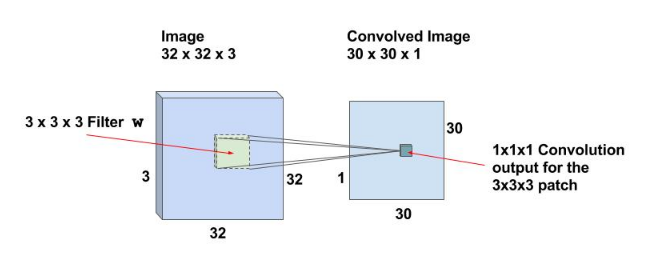
Activation Maps
- 32x32x3 input image with filter 3x3x3 makes the output 30x30x1
- there is a neuron corresponding to each location
- 30x30x1 outputs : activations of all neurons are called the activation maps
Shared weights and biases
- There are 30x30 = 900 neurons
- In case of CNNs the neurons corresponding to one filter in a layer share the same weights and biases
Stride
- In the above case, filter slid the window by 1 pixel at a time
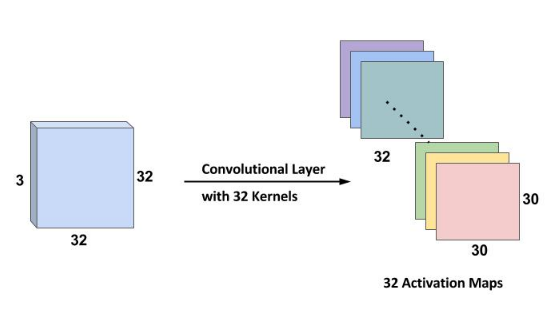
Multiple Filters
- If we use 32 filters we will have an activation map of size 30x30x32
- The number of weights while using 32 filters is simply 3x3x3x32=288 and the number of biases is 32
Zero padding
- The output reduces in size after each convolution
- For convenience, it’s a standard practice to pad zeros to the boundary of the input layer such that the output is the same size as input layer
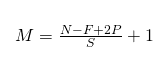
- Input NxN, filter size F, Stride S and a zero padding of size P
- the output size is belows:
CNN learns Hierarchical Features
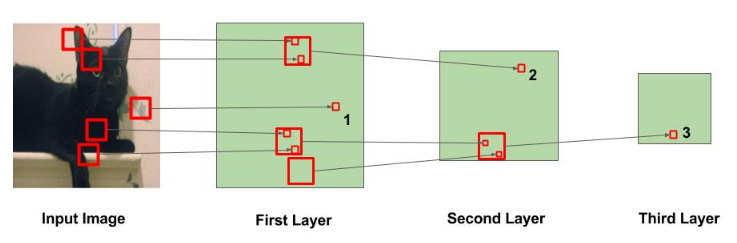
- The big squares indicate the region over which convolution operation is performed
- The small squares indicate the output of the operation which is just a number
- In the first layer, the squared marked 1 is obtained from the area in the image where the leaves are painted
- In the second layer, the squared marked 2 is obtained from the bigger square in Layer 1, The number in this square is obtained from multiple regions from input image. Specifically the whole area around the left ear of the cat is responsible for that value
- In the third layer, this squared marked 3 is obtained from a large region around the leg area
- Thus the neurons at the later layers can learn more complicated features like eyes/legs
Max Pooling Layer
- Pooling layer is used to reduce the spatial size after each convolution layer
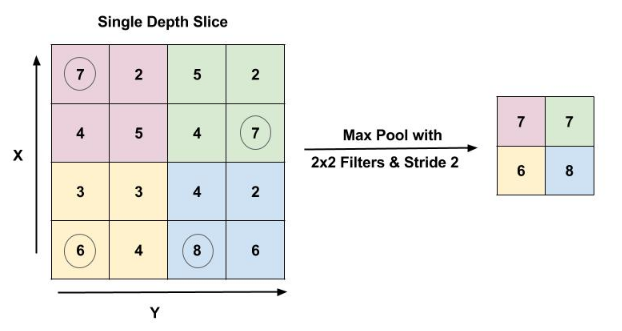
- Max pool layer with filter size 2x2 and stride 2
Implementing CNNs in Keras
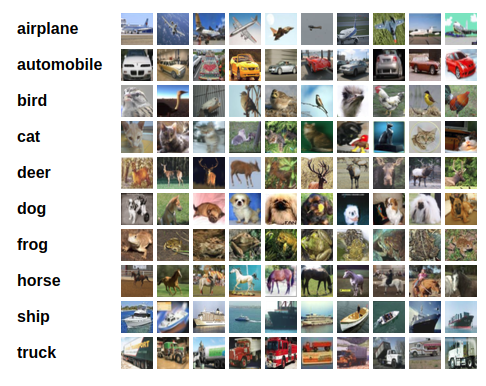
CIFAR10
- 50,000 training images and 10,000 test images
- 10 classes like airplane, automobile,birds…
- The images are 32x32 size
The Network Implementation
from keras.models import Sequential
from keras.layers import Dense, Conv2D, MaxPooling2D, Dropout, Flatten

def createModel():
    model = Sequential()
    model.add(Conv2D(32, (3, 3), padding='same', activation='relu', input_shape=input_shape))
    model.add(Conv2D(32, (3, 3), activation='relu'))
    model.add(MaxPooling2D(pool_size=(2, 2)))
    model.add(Dropout(0.25))

    model.add(Conv2D(64, (3, 3), padding='same', activation='relu'))
    model.add(Conv2D(64, (3, 3), activation='relu'))
    model.add(MaxPooling2D(pool_size=(2, 2)))
    model.add(Dropout(0.25))

    model.add(Conv2D(64, (3, 3), padding='same', activation='relu'))
    model.add(Conv2D(64, (3, 3), activation='relu'))
    model.add(MaxPooling2D(pool_size=(2, 2)))
    model.add(Dropout(0.25))

    model.add(Flatten())
    model.add(Dense(512, activation='relu'))
    model.add(Dropout(0.5))
    model.add(Dense(nClasses, activation='softmax'))

    return model
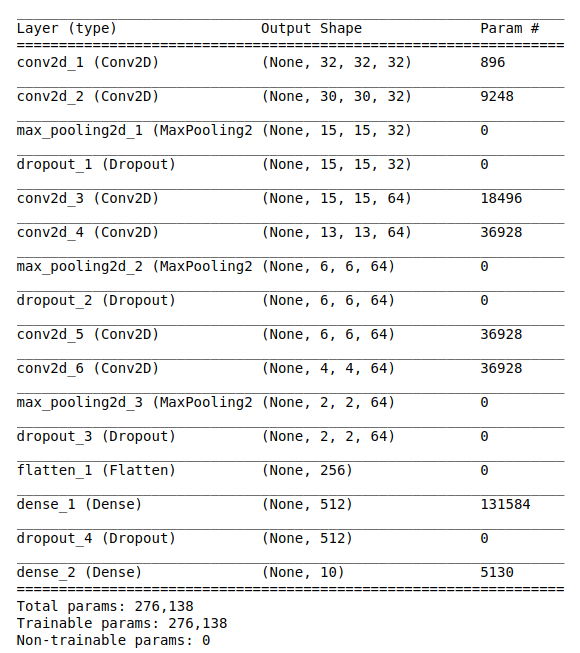
- 6 convolution layers and 1 fully connected layer
-
32 filters/ kernels with a window size of 3x3
- model summary
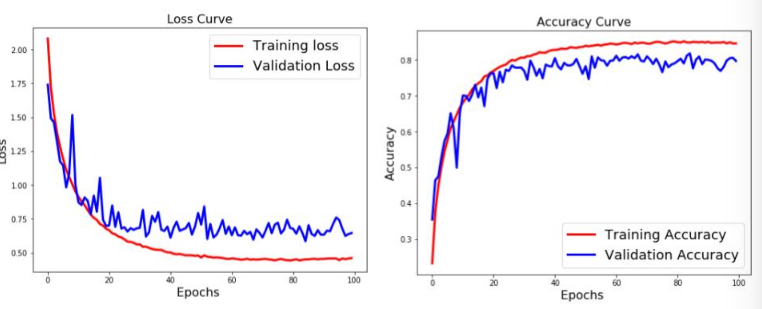
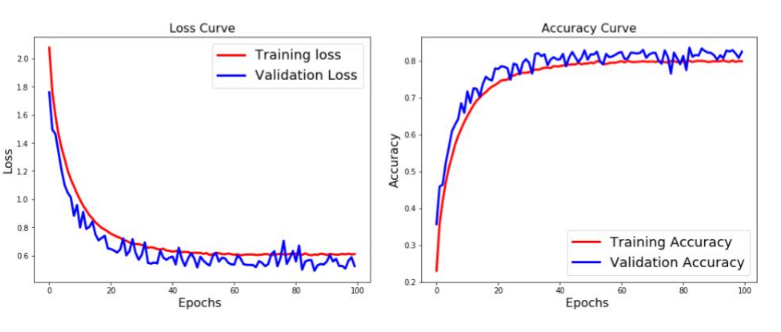
Training the network
- simple workflow create -> compile -> fit
- categorical cross entropy loss and use RMSProp optimizer with 100 epochs
model1 = createModel()
batch_size = 256
epochs = 100
model1.compile(optimizer='rmsprop', loss='categorical_crossentropy', metrics=['accuracy'])

history = model1.fit(train_data, train_labels_one_hot, batch_size=batch_size, epochs=epochs, verbose=1,
                   validation_data=(test_data, test_labels_one_hot))

model1.evaluate(test_data, test_labels_one_hot)
Data Augmentation
- Another very effective way to couner overfitting is Data Augmentation
- It is the process of artificially creating more images from the images you already have by changing the size, orientation
- in Keras using the ImageDataGenerator
from keras.preprocessing.image import ImageDataGenerator

ImageDataGenerator(
    rotation_range=10.,
    width_shift_range=0.1,
    height_shift_range=0.1,
    shear_range=0.,
    zoom_range=.1.,
    horizontal_flip=True,
    vertical_flip=True)
from keras.preprocessing.image import ImageDataGenerator

model2 = createModel()

model2.compile(optimizer='rmsprop', loss='categorical_crossentropy', metrics=['accuracy'])

batch_size = 256
epochs = 100
datagen = ImageDataGenerator(
#         zoom_range=0.2, # randomly zoom into images
#         rotation_range=10,  # randomly rotate images in the range (degrees, 0 to 180)
        width_shift_range=0.1,  # randomly shift images horizontally (fraction of total width)
        height_shift_range=0.1,  # randomly shift images vertically (fraction of total height)
        horizontal_flip=True,  # randomly flip images
        vertical_flip=False)  # randomly flip images

# Fit the model on the batches generated by datagen.flow().
history2 = model2.fit_generator(datagen.flow(train_data, train_labels_one_hot, batch_size=batch_size),
                              steps_per_epoch=int(np.ceil(train_data.shape[0] / float(batch_size))),
                              epochs=epochs,
                              validation_data=(test_data, test_labels_one_hot),
                              workers=4)

model2.evaluate(test_data, test_labels_one_hot)
- We first create the model and configure it.
- Then we create an ImageDataGenerator object and configure it using parameters for horizontal flip, and image translation.
- The datagen.flow() function generates batches of data, after performing the data transformations / augmentation specified during the instantiation of the data generator.
-
The fit_generator function will train the model using the data obtained in batches from the datagen.flow function.
Tutorial
Image Classification using Convolutional Neural Networks in Keras
Keras Tutorial: The Ultimate Beginner’s Guide to Deep Learning in Python