Explorations of Using Python to play Grand Theft Auto 5
Explorations of Using Python to play Grand Theft Auto 5
- GTA 5 is a great environment to practice in for a variety of reasons
- With GTA, we can use modes to control the time of day, weather,traffic,speeds, what happens when we crash, all kinds of things
- It is a just a completely customizable environment
- This method can be done on a variety of games
- This initial goal is to create a sort of self-driving car
- The method he will use to access the game should be do-able on almost any game
- Things like sun glare in GAT V will make computer vision much more challenging, but also more realistic
- We can teach an AI to play games by simply showing it how to play for a bit, using CNN on that information, and then letting the AI poke around
- Here are initial thoughts
- We can access frames from the scree
- We can mimic key-presses(sendkeys,pyautogui and probably many other options)
- This is enough for rudimentary tasks, but what about for deep learning?
- The only extra thing we might want is something that can also log various events from the game world
- Since most games are played almost completely visually, we can handle for that, and we can also track mouse position and key presses, allowing us to engage in deep learning
- Main concern is processing everything fast enough
- So this is quite a large project
- The initial goals are
- Access the game screen at a somewhat decent FPS Anything over 5 should be workable for us, unpleasant to watch, but workable,and we can always watch the actual live game, rather than the processing frames
- Send keyboard input to game screen.
- Try some form of joystick input if possible(especially considering throttle and turning)
- Simple self-driving car that stays in some lanes under simple conditions(High sun,clear day, no rain, no traffic…)
So step 1, how should we actually accesses our screen?
- refer to this implementation stackoverflow impl, it just appears to have a typo on the import, ImageGrab is part of PIL
import numpy as np
# from PIL import ImageGrab # Windows or Mac
import pyscreenshot as ImageGrab # Ubuntu
import cv2
import time

def screen_record():
    last_time = time.time()
    while(True):
        # 800x600 windowed mode
        printscreen =  np.array(ImageGrab.grab(bbox=(0,40,800,640)))
        print('loop took {} seconds'.format(time.time()-last_time))
        last_time = time.time()
        cv2.imshow('window',cv2.cvtColor(printscreen, cv2.COLOR_BGR2RGB))
        if cv2.waitKey(25) & 0xFF == ord('q'):
            cv2.destroyAllWindows()
            break
- ImageGrab is only availeble for Windows or Mac Python: Using Pyscreenshot image to get RGB values (Linux)
- This gives 12 ~ 13 FPS
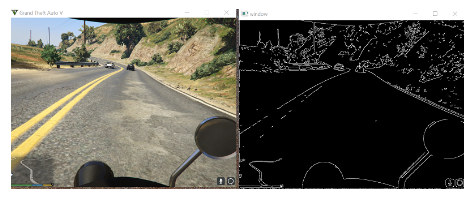
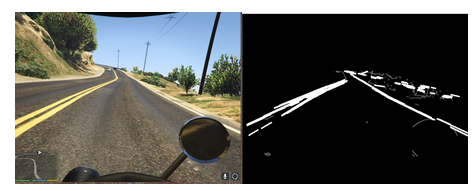
The next thing we want to do is to run OpenCV on the captured screen data
-
We’ll convert the image to grayscale to simplify things and edge detection to eventually be used for finding the lines that will be our lanes
-
let’s add some grayscale and edges
import numpy as np
# from PIL import ImageGrab
import pyscreenshot as ImageGrab # Ubuntu
import cv2
import time


def process_img(image):
    original_image = image
    # convert to gray
    processed_img = cv2.cvtColor(image, cv2.COLOR_BGR2GRAY)
    # edge detection
    processed_img =  cv2.Canny(processed_img, threshold1 = 200, threshold2=300)
    return processed_img

def main():
    last_time = time.time()
    while True:
        screen =  np.array(ImageGrab.grab(bbox=(0,40,800,640)))
        #print('Frame took {} seconds'.format(time.time()-last_time))
        last_time = time.time()
        new_screen = process_img(screen)
        cv2.imshow('window', new_screen)
        #cv2.imshow('window',cv2.cvtColor(screen, cv2.COLOR_BGR2RGB))
        if cv2.waitKey(25) & 0xFF == ord('q'):
            cv2.destroyAllWindows()
            break
pyautogui, Control the keyboard and mouse from a Python script
import pyautogui
import time
# gives us time to get situated in the game
for i in list(range(4))[::-1]:
    print(i+1)
    time.sleep(1)

print('down')
pyautogui.keyDown('w')
time.sleep(3)
print('up')
pyautogui.keyUp('w')
>>
4
3
2
1
down
up
- But Some games want “Direct Input” instead of pyautogui sendkeys
- Window direct key input examples
# direct inputs
# source to this solution and code:
# http://stackoverflow.com/questions/14489013/simulate-python-keypresses-for-controlling-a-game
# http://www.gamespp.com/directx/directInputKeyboardScanCodes.html

import ctypes
import time

SendInput = ctypes.windll.user32.SendInput


W = 0x11
A = 0x1E
S = 0x1F
D = 0x20

# C struct redefinitions
PUL = ctypes.POINTER(ctypes.c_ulong)
class KeyBdInput(ctypes.Structure):
    _fields_ = [("wVk", ctypes.c_ushort),
                ("wScan", ctypes.c_ushort),
                ("dwFlags", ctypes.c_ulong),
                ("time", ctypes.c_ulong),
                ("dwExtraInfo", PUL)]

class HardwareInput(ctypes.Structure):
    _fields_ = [("uMsg", ctypes.c_ulong),
                ("wParamL", ctypes.c_short),
                ("wParamH", ctypes.c_ushort)]

class MouseInput(ctypes.Structure):
    _fields_ = [("dx", ctypes.c_long),
                ("dy", ctypes.c_long),
                ("mouseData", ctypes.c_ulong),
                ("dwFlags", ctypes.c_ulong),
                ("time",ctypes.c_ulong),
                ("dwExtraInfo", PUL)]

class Input_I(ctypes.Union):
    _fields_ = [("ki", KeyBdInput),
                 ("mi", MouseInput),
                 ("hi", HardwareInput)]

class Input(ctypes.Structure):
    _fields_ = [("type", ctypes.c_ulong),
                ("ii", Input_I)]

# Actuals Functions

def PressKey(hexKeyCode):
    extra = ctypes.c_ulong(0)
    ii_ = Input_I()
    ii_.ki = KeyBdInput( 0, hexKeyCode, 0x0008, 0, ctypes.pointer(extra) )
    x = Input( ctypes.c_ulong(1), ii_ )
    ctypes.windll.user32.SendInput(1, ctypes.pointer(x), ctypes.sizeof(x))

def ReleaseKey(hexKeyCode):
    extra = ctypes.c_ulong(0)
    ii_ = Input_I()
    ii_.ki = KeyBdInput( 0, hexKeyCode, 0x0008 | 0x0002, 0, ctypes.pointer(extra) )
    x = Input( ctypes.c_ulong(1), ii_ )
    ctypes.windll.user32.SendInput(1, ctypes.pointer(x), ctypes.sizeof(x))

if __name__ == '__main__':
    PressKey(0x11)
    time.sleep(1)
    ReleaseKey(0x11)
    time.sleep(1)
We get a full list of direct x scan codes here: direct x scan codes
We’re interesting in W, A, S, and D for now:
W = 0x11
A = 0x1E
S = 0x1F
D = 0x20
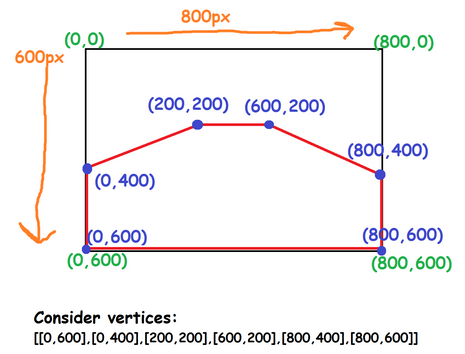
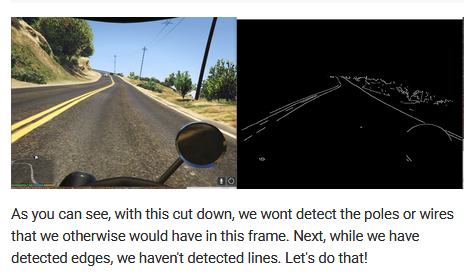
Region of Interest for finding lanes
- We’re back on the task of trying to do some self-driving
- In order to do this, a common goal is to be able to detect lanes
import numpy as np
from PIL import ImageGrab
import cv2
import time
...

def process_img(original_image):
    processed_img = cv2.cvtColor(original_image, cv2.COLOR_BGR2GRAY)
    processed_img = cv2.Canny(processed_img, threshold1=200, threshold2=300)

    vertices = np.array([[10,500],[10,300],[300,200],[500,200],[800,300],[800,500],
                         ], np.int32)
    processed_img = roi(processed_img, [vertices])

    return processed_img
def roi(img, vertices):
    #blank mask:
    mask = np.zeros_like(img)
    # fill the mask
    cv2.fillPoly(mask, vertices, 255)
    # now only show the area that is the mask
    masked = cv2.bitwise_and(img, mask)
    return masked
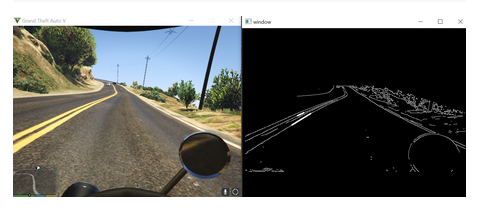
Hough Lines
def process_img(original_image):
    processed_img = cv2.cvtColor(original_image, cv2.COLOR_BGR2GRAY)
    processed_img = cv2.Canny(processed_img, threshold1=200, threshold2=300)

    vertices = np.array([[10,500],[10,300],[300,200],[500,200],[800,300],[800,500],
                         ], np.int32)
    processed_img = roi(processed_img, [vertices])


    # more info: http://docs.opencv.org/3.0-beta/doc/py_tutorials/py_imgproc/py_houghlines/py_houghlines.html
    #                          edges       rho   theta   thresh         # min length, max gap:
    lines = cv2.HoughLinesP(processed_img, 1, np.pi/180, 180,      20,         15)
    draw_lines(processed_img,lines)
    return processed_img
- HoughlinesP algorithm
def draw_lines(img,lines):
    for line in lines:
        coords = line[0]
        cv2.line(img, (coords[0], coords[1]), (coords[2], coords[3]), [255,255,255], 3
- draw lines on the image
def process_img(original_image):
    processed_img = cv2.cvtColor(original_image, cv2.COLOR_BGR2GRAY)
    processed_img = cv2.Canny(processed_img, threshold1=200, threshold2=300)
    vertices = np.array([[10,500],[10,300],[300,200],[500,200],[800,300],[800,500],
                         ], np.int32)

    processed_img = cv2.GaussianBlur(processed_img,(5,5),0)
    processed_img = roi(processed_img, [vertices])

    # more info: http://docs.opencv.org/3.0-beta/doc/py_tutorials/py_imgproc/py_houghlines/py_houghlines.html
    #                          edges       rho   theta   thresh         # min length, max gap:
    lines = cv2.HoughLinesP(processed_img, 1, np.pi/180, 180,      20,         15)
    draw_lines(processed_img,lines)
    return processed_img
- use GausssinaBlur
Finding Lanes for self-driving car
- find the edges, selected a region of interest, and then finally have found lines
import numpy as np
from PIL import ImageGrab
import cv2
import time
from numpy import ones,vstack
from numpy.linalg import lstsq
from directkeys import PressKey, W, A, S, D
from statistics import mean

def roi(img, vertices):

    #blank mask:
    mask = np.zeros_like(img)

    #filling pixels inside the polygon defined by "vertices" with the fill color
    cv2.fillPoly(mask, vertices, 255)

    #returning the image only where mask pixels are nonzero
    masked = cv2.bitwise_and(img, mask)
    return masked


def draw_lanes(img, lines, color=[0, 255, 255], thickness=3):

    # if this fails, go with some default line
    try:

        # finds the maximum y value for a lane marker
        # (since we cannot assume the horizon will always be at the same point.)

        ys = []
        for i in lines:
            for ii in i:
                ys += [ii[1],ii[3]]
        min_y = min(ys)
        max_y = 600
        new_lines = []
        line_dict = {}

        for idx,i in enumerate(lines):
            for xyxy in i:
                # These four lines:
                # modified from http://stackoverflow.com/questions/21565994/method-to-return-the-equation-of-a-straight-line-given-two-points
                # Used to calculate the definition of a line, given two sets of coords.
                x_coords = (xyxy[0],xyxy[2])
                y_coords = (xyxy[1],xyxy[3])
                A = vstack([x_coords,ones(len(x_coords))]).T
                m, b = lstsq(A, y_coords)[0]

                # Calculating our new, and improved, xs
                x1 = (min_y-b) / m
                x2 = (max_y-b) / m

                line_dict[idx] = [m,b,[int(x1), min_y, int(x2), max_y]]
                new_lines.append([int(x1), min_y, int(x2), max_y])

        final_lanes = {}

        for idx in line_dict:
            final_lanes_copy = final_lanes.copy()
            m = line_dict[idx][0]
            b = line_dict[idx][1]
            line = line_dict[idx][2]

            if len(final_lanes) == 0:
                final_lanes[m] = [ [m,b,line] ]

            else:
                found_copy = False

                for other_ms in final_lanes_copy:

                    if not found_copy:
                        if abs(other_ms*1.2) > abs(m) > abs(other_ms*0.8):
                            if abs(final_lanes_copy[other_ms][0][1]*1.2) > abs(b) > abs(final_lanes_copy[other_ms][0][1]*0.8):
                                final_lanes[other_ms].append([m,b,line])
                                found_copy = True
                                break
                        else:
                            final_lanes[m] = [ [m,b,line] ]

        line_counter = {}

        for lanes in final_lanes:
            line_counter[lanes] = len(final_lanes[lanes])

        top_lanes = sorted(line_counter.items(), key=lambda item: item[1])[::-1][:2]

        lane1_id = top_lanes[0][0]
        lane2_id = top_lanes[1][0]

        def average_lane(lane_data):
            x1s = []
            y1s = []
            x2s = []
            y2s = []
            for data in lane_data:
                x1s.append(data[2][0])
                y1s.append(data[2][1])
                x2s.append(data[2][2])
                y2s.append(data[2][3])
            return int(mean(x1s)), int(mean(y1s)), int(mean(x2s)), int(mean(y2s))

        l1_x1, l1_y1, l1_x2, l1_y2 = average_lane(final_lanes[lane1_id])
        l2_x1, l2_y1, l2_x2, l2_y2 = average_lane(final_lanes[lane2_id])

        return [l1_x1, l1_y1, l1_x2, l1_y2], [l2_x1, l2_y1, l2_x2, l2_y2]
    except Exception as e:
        print(str(e))


def process_img(image):
    original_image = image
    # convert to gray
    processed_img = cv2.cvtColor(image, cv2.COLOR_BGR2GRAY)
    # edge detection
    processed_img =  cv2.Canny(processed_img, threshold1 = 200, threshold2=300)

    processed_img = cv2.GaussianBlur(processed_img,(5,5),0)

    vertices = np.array([[10,500],[10,300],[300,200],[500,200],[800,300],[800,500],
                         ], np.int32)

    processed_img = roi(processed_img, [vertices])

    # more info: http://docs.opencv.org/3.0-beta/doc/py_tutorials/py_imgproc/py_houghlines/py_houghlines.html
    #                                     rho   theta   thresh  min length, max gap:
    lines = cv2.HoughLinesP(processed_img, 1, np.pi/180, 180,      20,       15)
    try:
        l1, l2 = draw_lanes(original_image,lines)
        cv2.line(original_image, (l1[0], l1[1]), (l1[2], l1[3]), [0,255,0], 30)
        cv2.line(original_image, (l2[0], l2[1]), (l2[2], l2[3]), [0,255,0], 30)
    except Exception as e:
        print(str(e))
        pass
    try:
        for coords in lines:
            coords = coords[0]
            try:
                cv2.line(processed_img, (coords[0], coords[1]), (coords[2], coords[3]), [255,0,0], 3)


            except Exception as e:
                print(str(e))
    except Exception as e:
        pass

    return processed_img,original_image


def main():
    last_time = time.time()
    while True:
        screen =  np.array(ImageGrab.grab(bbox=(0,40,800,640)))
        print('Frame took {} seconds'.format(time.time()-last_time))
        last_time = time.time()
        new_screen,original_image = process_img(screen)
        cv2.imshow('window', new_screen)
        cv2.imshow('window2',cv2.cvtColor(original_image, cv2.COLOR_BGR2RGB))
        #cv2.imshow('window',cv2.cvtColor(screen, cv2.COLOR_BGR2RGB))
        if cv2.waitKey(25) & 0xFF == ord('q'):
            cv2.destroyAllWindows()
            break
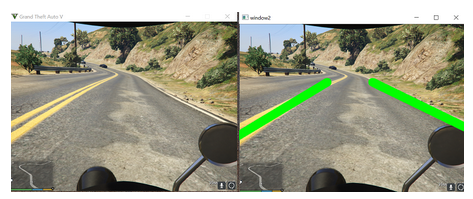
Self Driving Car control
def straight():
    PressKey(W)
    ReleaseKey(A)
    ReleaseKey(D)

def left():
    PressKey(A)
    ReleaseKey(W)
    ReleaseKey(D)
    ReleaseKey(A)

def right():
    PressKey(D)
    ReleaseKey(A)
    ReleaseKey(W)
    ReleaseKey(D)

def slow_ya_roll():
    ReleaseKey(W)
    ReleaseKey(A)
    ReleaseKey(D)

def main():
    last_time = time.time()
    while True:
        screen =  np.array(ImageGrab.grab(bbox=(0,40,800,640)))
        print('Frame took {} seconds'.format(time.time()-last_time))
        last_time = time.time()
        new_screen,original_image, m1, m2 = process_img(screen)
        #cv2.imshow('window', new_screen)
        cv2.imshow('window2',cv2.cvtColor(original_image, cv2.COLOR_BGR2RGB))

        if m1 < 0 and m2 < 0:
            right()
        elif m1 > 0  and m2 > 0:
            left()
        else:
            straight()

        #cv2.imshow('window',cv2.cvtColor(screen, cv2.COLOR_BGR2RGB))
        if cv2.waitKey(25) & 0xFF == ord('q'):
            cv2.destroyAllWindows()
            break
Reference sites
Explorations of Using Python to play Grand Theft Auto 5
Reading game frames in Python with OpenCV - Python Plays GTA V